Monday, September 29, 2008

Decorative Painting on Plate Chargers

Chargers For My Fiesta ware

Since I already had 8 teak wood charger plates, this project was easy. I decided to paint small rows of simple flowers around each charger to match the coordinating fiesta plate. In the photo below you can see the tiny flowers painted with acrylic paints. These flowers are orange and they go with the orange plate.

So I did this for each individual plate.

Red Fiesta plate with matching charger.


Green Fiesta plate


Teal Fiesta plate


Blue......


Below a closer look at the painting


This plate is the only one that doesn't exactly match. I did that on purpose, so I would have one charger that would go with all the other colors I have. White with yellow centers.

A few of them together.....


Fiesta Yellow


A started each plate by painting alternating dots. Then I used a very thin brush and make plain little petals. No measuring, just free hand. No two plates are exact and that's exactly how I wanted it.
I've seen chargers in the store for reasonable prices. Wouldn't these look great with little rows of holly for the holidays?
Each plate was sprayed with a high gloss shellac to protect them. They are made of wood, so they can't be washed but they clean up very nicely with a quick wipe of a sponge.


01 02 12

Friday, September 26, 2008

Fixing Wood Rot


The Elements are Killing My House
Yes, I know this is suppose to be a decorating/craft/thrifty blog but all that is worthless if the house is falling apart from under you. This post can help you save money by doing it yourself. I can do it, so you can do it. Read on.....

Here in Atlanta we get some real extremes in temperature-blistering heat in the summer and some days with below freezing temps in the winter. Those changes in temperatures really do a number on the exterior of my home.


Every year I try and take a "tour" of the exterior of my house after summer and look for any problems that need attention. Better to find those problems before you have to sink a fortune into repairs and have major problems.


After taking a good look at my front porch, I realized there was lots of work to do. I had stains on the cement, several lose bricks, exterior lights that needed replacing and plenty of rotten wood to repair.


Here's what I mean.......
Here is the first sign of the rot that had infested my door trim. You could put a screwdriver right into this wood because it was rotten and soft. I got my saw out and cut out the rotted part rather than replacing the entire trim. This is the saw I used to do it. A great tool for me because it's cordless,variable speed and light weight. I bought this a few months ago (cost around 39.00) in Walmart.
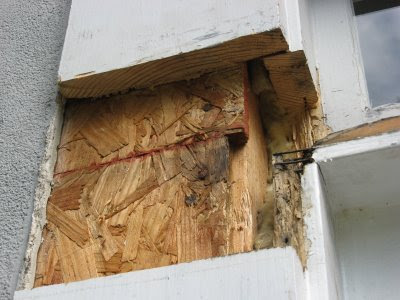
This is another section, all cut out and left to dry in the sun. Pretty bad looking isn't it? I measured out a piece of wood to glue in using liquid nails. Here is my replacement piece, glued and nailed in. What do I use for filling all those cracks and crevices? The best product ever. I read about this a few years ago on several different websites about filling and repairing rotten wood. It's called Bondo and it's available in Lowe's and Home Depot.


This product costs about $10.00 and is a two-part putty. They use it for automotive repairs, but it's now commonly used to fill in areas in wood work. It's great stuff and hardens like a rock. So if you have a small area that you can't plug in with another piece of wood, you can use Bondo. It's not easy to use, because it drys so quickly, but you get use to working with it. I usually place the compound on a piece of cardboard, add the hardener, mix quickly and then apply. This stuff is "rot proof" and can be sanded. Photo below shows piece all sanded.

All sanded and primed it now is clean, dry and strong. Oh yeah, it looks better too. I won't kid you though, it took a lot of work.


Fixing is one thing, but you know I needed to add some decorative touches. I am adding four decorative pieces to each corner. I've cut four pieces of pine measuring about 12" X 6" (the size of my door trim). In addition, each piece has a rosette and long trim.


All the pine pieces are caulked (I used my free sample that I got in the mail) and primed several times. All four of these rectangles will be connected with trim. When it's all done, I'll take a photo and present it to you here.

So here is what we have:

  • taking a tour can help you find all those potential "expensive" problems.
  • Bondo works great for filling in rotted areas
  • You can always add to the look of your door by adding decorative woodwork
  • caulk, caulk, caulk. If I had caulked these areas faithfully, I wouldn't have rot at all. Check all your doors and windows....save yourself some money!

*I'll post a photo when all the decorative pieces are connected, primed and painted. I'm hoping it looks really nice when it's finished.
01 02 12

Monday, September 22, 2008

Setting Your Table

Table Settings


I have 8 teak plate chargers that have been sitting around in my dining room drawer for a couple of years. I don't use them very much but they are very pretty. Fiesta ware is what I use for everyday kitchen plates so I decided to paint a small design around each charger to match all the colors of my Fiesta ware. I'll bring that to you in a few days as I finish up the last plate.


While I'm on the subject of table settings I thought you may enjoy some real beautiful looks for tables. The more I see, the more I want some new looks for my own table. How about you?
I'm not all that formal, but I thought it may be important to show exaclty how a table should be set, as the above photo shows. You get the idea....


photo: courtesy of www.table-settings-with-pictures.com
A sweet setting for Valentine's Day. I love the heart shaped plate. Believe me, I'm tempted-but where do you store all these beautiful, theme plates?

photo: courtesy of http://www.table-settings-with-pictures.com/These colors are gorgeous together!

photo: courtesy of http://www.flickr.com/
I could see this around Christmas or New Years.


photo: courtesy of http://www.photobucket.com/

I love the colors in this setting. A more traditional look, but lovely for sure.

photo: courtesy of http://www.activedin.com/


Happy Thanksgiving?I love this earthy look.

photo: courtesy of http://www.apartmenttherapy.com/
A simple and elegant setting. Notice the sprigs of dried flower on every plate.

photo: courtesy of http://www.barillaus.com/

A sophisticated look-very visual and geometric. This settings makes a statement. I could definately see this setting for a business dinner.

It's just fun to look around and see what others are doing on their tables. It's definately a way to show some creativity.
01 02 12

Tuesday, September 16, 2008

How Important Is Your Front Porch?

photo : compliments of mountainviewhse.com
It's just my opinion, but I really believe that your front porch should be welcoming to guests. Some people may even make an assessment about "you" when they reach your front door. Not fair.....but it happens.

Hypothetical:

You go to someone's front door. The molding around the door is rotting away, there are no flowers, the wrought iron railing is rusted, the front door needs painting and there is no welcome mat.

Now you go to another front door. The porch is clean, there is a welcome mat, several urns with blooming flowers, all wood work is freshly painted and perhaps a decorated bench to sit on.

Let's face it, the difference is amazing. Do you draw conclusions about "who" lives in the house? Well, we shouldn't, but most of us just might do it anyway.

A few weeks ago I had the opportunity to visit several homes that are currently on the market. The owners did such a nice job of presenting there homes by making their front door area so inviting. Ok.....so maybe it's "I want to sell my home, so I'll make it look great", but it should be something we all do. First impressions or maybe curb appeal?


My family and I all enter the house through the garage so I really don't pay much attention to the front porch. After going out and looking at all the beautiful front porches of the "for sale" homes, I came home to more closely scrutinize my own. OMG-what a mess!!! All of those things I mentioned before, applied to me. Rotted wood, dead flowers, stains on the cement, dirty windows and a rusted railing. What was I thinking or not thinking about?


Needless to say, I've been working on completely re-doing that porch. I have before and after photographs to show you but I have to finish it all up. It's a big job. In the mean time, I have found some wonderful photos of front door areas.
Nothing like a fresh coat of paint to lighten and brighten the front door.

A typically southern entrance, beautifully decorated with flowers and wicker furniture. Even the porch is painted blue which just adds to the colorful arrangement of items.


A red door on a coloniel style white home. The Chinese believe that a red door brings good luck to it's owners. Look at the Wisteria vine that hovers around the front door. I can't tell if it's real or silk, but it looks wonderful.

I especially like the red wreath with the matching planters. Interesting.......cactus growing? It looks really nice though.


Here again we see the red door. I love the brass accents and the decorative windows.
If "majestic" is what you are looking for, I think we found it in this door above.
I really like those decorative columns! This entry way also features some beautiful flowers. Very welcoming.


How do you like the color of the floor? I love it!

Here are all the changes I'm working on right now.

  • priming and painting my railing-black, high gloss
  • replaced aging, ugly outdoor lanterns with black one (much nicer)
  • cut out and replaced all rotten wood
  • purchased 2 large urns and potted flowers in them
  • I'm doing something to my bricks. They look sad and faded. Still working on that.
  • Adding decorative molding around my front door. They are currently flat and uninteresting.
  • power washed the cement and bricks
  • re-paint the front door. It's black with a stained glass piece and will be re-painted black.

That's it! But that's a lot of work. Stay tuned for the transformation.


01 02 12

Friday, September 12, 2008

Changing Your High Hat Lights Into Hanging Pendants

What A Neat Idea!


My girlfriend had mentioned to me months ago that she would love to convert two high hat light fixtures, above her breakfast bar into hanging pendants. She just didn't want to spend a lot of money hiring an electrician to install the lights, so the project was on hold.


I was reading someones blog a few weeks ago and stumbled upon some new technology that I didn't even know existed. They now sell conversion kits that you can purchase so you can easily install them yourself. I'm telling you: so, so easy!!


A week later I saw them in Lowe's Home Improvement center. $17.98 for one kit and anywhere between $9.00-$17.00 for a shade. They had a nice selection of glass shades in all shapes and designs. Let's face it-it would cost a whole lot more to hire an electrician and buy both the lamps. Total cost for both lamp shades and 2 conversion kits: around $70.00. Installation time: about 45 minutes-most of that time was spent reading the instructions and measuring to get them exactly the same.


Before:


After:


The only problem became the chandelier over the kitchen-it didn't match these lamps. It was stark white with gold fittings. Easy enough to fix-she sponged it carefully with brown paint (while it was still hanging). No electricians, no fuss, not expensive and easy to do. What a great idea!


If you want to take a look at what how these conversion kits work, take a look at this site I found. It has a short video on how to use them. You can order these kits on the Internet, but I found that Lowe's had the best price.

http://www.worthhomeproducts.com/


01 02 12

Monday, September 8, 2008

Thrift store Makeover of Chair and Mirror

I purchased this chair in a local thriftstore with my son in mind. He needed a chair for his room and when I saw this, I realized it would be perfect. At the time, his room was decorated in a "rustic" decor which included some bears and pine trees. He's older now so thing have changed considerably. He actually moved into another room a few years ago. This chair, which cost me $5.00 was sturdy and in great shape-all it needed was some paint and a little imagination.


It was painted using mostly metallic acrylics. For a kid's room I thought this would make it more interesting. Each part or section of the chair had a different color. It took a while to paint it but it really looked good in that room at the time. I clear coated the chair with several coats of paint.


The mirror below was $3.00. I painted it and added the wood cut out trees and stars to the top, adding some more interest to a plain mirror.


The mirror was painted with a dark brown base coat and sponged with a rust color. The tree you see on the wall was painted with acrylics. The whole room came together very nicely.

The only problem with decorating for a kids room is they grow up so fast. Before you know it, they have grown out of the "room motif". If you like to decorate and re-decorate, it's not a problem. The goods news is that all the furniture was cheap (and I mean cheap). It can all be re-painted and fine tuned for the teenage years.

Ok.....that's just more work!!


01 02 12

Friday, September 5, 2008

More Faux Painting On Cabinets

Faux Finishing Bathroom Cabinets

My last post showed you what I did with master bathroom cabinets. This one will show you what I did in the bathroom that my daughters share. This bathroom was painted green with all accents in animal prints (towels, shower curtain and accessories). The cabinets were high gloss white and needed a different look to blend with the decor.


All the drawers were removed and sanded slightly to scuff up the paint. The same was done for the front of the entire cabinet.

I added the wooden cut-outs that I had painted by hand to match the walls. I used "liquid nails" to fasten them to the cabinets.

The cabinets were painted flat white. After they dried, I applied a glaze that was mixed with a brownish color and then I basically just wiped the front down with the glaze (following the direction of the grain).

All cabinets were sealed with a polyurethane to protect them. You'll notice to the right there is a small curtain. This area is where a vanity chair should go. Neither girl uses this area to sit, so I installed shelves and sewed up a little curtain for the front. In that area I store the larger things like hair dryers, flat irons etc......

Just another way to faux the cabinets and give them a new look.

01 02 12