Tuesday, September 17, 2013

Painting Brick

I didn't know if you could paint brickwork.  My front porch bricks were so faded and old looking, that it just gave the whole front entrance a sad look.  It's looked like this for a few years now.  The sun beats down on those bricks everyday for hours, so time was really showing on them. Let's face it: the front door is the very first thing you see when when you arrive at someone's house. It should look friendly, clean and welcoming-don't ya think?
I searched around the Internet for some help, but didn't find much.  So hard could it
be?


I took a ride to Home Depot and bought a bottle of cement stain.  It's full strength and you're suppose to add it to cement.  So I figured that I could add a little water and  just paint it onto my bricks.  I wasn't sure if it would work but for 6 bucks I wasn't going to lose much. It doesn't say that you can use this stuff for painting brick, cut it's close enough for me.

I picked a bright, sunny day and went to work.

Supplies:
1. Water
2. Cement stain
3. paintbrush
4. cup of coffee for myself 'cause it's pretty early.

Before starting this project, I power washed the porch. Nice and clean and ready to roll. It must be dry though.

I simply painted every brick and just couldn't get over the transformation. Wow....I'm so glad I did this.  Now the important part is: will it last?  What if it rains and the paint comes off?  What if it doesn't last? Will it fade with time?  I can answer some questions.

It did rain and the paint is still there. That's good.
It could fade over time.  I'm hoping it sticks around though, because it looks really good.


Don't know if it will last but it's been four weeks and it's still looking good.
So I think that you CAN paint brick.  This paint just absorbed into the old brick like the brick was a sponge, so I'm pretty sure it will last a while.

Christy01 02 12

Wednesday, August 21, 2013

Repurposing Old Glassware


Here are some cute ideas for glassware that you may have hanging around.  It's a great way to use pieces that have lost their use in your home.  In other words, they are random pieces that need a new use and a new purpose.  The whole idea is to find nice plates or bowls that you like and glue them to candlestick holders.

Here are some examples:
  I found this metal candlestick in the Goodwill.  It was ugly and dark green so I painted it red.

 Below is a glass bowl that I also purchased in a thrift store.  Total cost: $2.00 for both.  The bowl was clear when I bought it.  It had raised "roses" on the bottom so I hit it with Rub N Buff.  This product (comes in small tubes) and works well with the tip of your finger. It also comes in many colors.  Just place a little on your finger and rub over the edges that are raised.  The effect is seen below.


When it's all dry I sprayed it with red spray paint.  Rustoleum is my spray of choice. It's very durable and permanent. 

Here's what it looks like from above the bowl. When the bowl and candlestick are all dry, glue them together. I use E-6000 glue.  Works great when attaching glass.

 Here is the same idea using a similar bowl.  This one was also clear, with ridges. The candlestick was clear glass as well.  I've used the Rub N Buff again and sprayed the entire piece black. I love the way this one looks. When they are all finished, these work great for serving candy or cookies.  I'm thinking they would be great around the holidays.


Here I have used small plates and sprayed the clear, glass candlesticks brown & black. I also added some glass beads at the base.  These work well as candy dishes.


They are very unusual and unique.  Would make great gifts too!  I would stick to hand washing them.  I'm currently trying this out for a cake plate.  

Christy


01 02 12

Sunday, August 11, 2013

The Man In the Moon

Sometimes you find something and think to yourself, what can I do with this?  What was it, what does it need and what was it meant to be?  I call this vision.  Looking at a piece of junk and having the vision to repurpose it.

I found this candle holder in a thrift store and decided to make it new and different looking.  It was made out of brass and was hollow in the center. I'm not sure what was in the center to begin with, but a piece of colored glass would fill it in nicely.  Also, the candle holder (which is behind the piece) would light up the glass.

I sprayed the brass piece with some Rustoleum Hand hammered antique brass spray paint.
 Painted some yellow dots on the moon (IDK, it just looked like it needed some whimsy.


 Clear coated the entire piece to protect the paint and it's all finished!
Looks really cute with a candle behind it.

Christy01 02 12

Sunday, August 4, 2013


I saw this piece in a thrift store and fell in love with it!  It was so unique, very detailed on the legs, and for only 10 bucks: I had to take it home. It needed a good cleaning and some TLC.  The legs were a bit wobbly, so I put some glue into the recessed holes and clamped them for a couple of hours. It also needed a good cleaning, so I actually used the outdoor hose and washed it, letting it dry out in the sunshine.

I thought about the color and what to do with it.  The decision was to repaint it red and apply a black glaze.

Supplies:
wood glue for repair
clamps to hold it
red Rustoleum spray paint
Black, Valspar paint
sandpaper
rubber gloves
old t-shirts
paint brush


I've sprayed the entire piece using the Rustoleum spray paint.  I used this paint because it adheres so well and is very durable when it dries.  The piece was baked out in the sun for hours to dry.
The Valspar glaze is applied with a brush and then promptly wiped off, as you can see from the photo.


Look at the detail in this piece!  I just love how the black glaze that settles in the nooks and crannies of this piece.

Just beautiful!

Here is the piece all finished.  No need for any clear coat on this one.  It should hold up just fine.


Christy

01 02 12

Saturday, July 27, 2013

Another Trash to Treasure project


Just found this little wooden tray in a junk store and had a vision for it.  First of all, it's solid wood.  That in of itself makes it worth the effort.  All painted up and detailed, it could serve as a place to throw "stuff", jewelry or whatever....
Before:

               It's actually pretty cute, but needs some art work added to it.

Supplies:

Sandpaper
latex paint
Acrylic paint
Clear Gloss Spray
Valspar Black Glaze

Step #1.
 Paint the tray with two coats of latex paint.  I picked a yellow color.
Step #2
I painted the entire tray with a black glaze and then wiped it off. Love the idea of adding black glaze that can seep into the crevices and give the piece an aged look. Now for some color.


Step #3
Add color.  Here I used acrylic paint to fill in the grapes and a few leafs. Work in progress here.  Only one side done so far.


Step: #4
Apply several coats of glossy varnish.  I'm giving it several coats so that it's durable enough to throw change and "things" into. The color in the photograph is slightly off.  It's more like the photo above.  Came out really pretty.

I love turning junk or trash into something useful!!

Christy


01 02 12

Thursday, July 11, 2013

Trash to Treasure

Turning the simplest item into something that you love! Sometimes it feels so good to change the look of something and transform it into something completely different. I seem to land up doing this all the time.  Make it new, fix it up, change the color or even the style.

This candlestick was about to be dumped into a landfill somewhere.  It was old, scratched and pretty ugly.  I'm not really sure what it's made of, but it feels like a resin.

I sanded it lightly, which is something that pretty much gets done every time something comes home.  If it's getting painted, then it's getting sanded.  The paint adheres to the item so much better when it's sanded first.

Painted with a brush and using a latex paint, I picked an old "blue" color.  Behr paints make these little containers of "sample" paint that is sold at Home Depot.  You can have them mix up any color from a sample and have these great paints at home for all sorts of projects.  I picked up 5 cans ($2.00 a piece) in blue,  light green, gold, pink and purple.  I use these all the time as a base coat for a Shabby Chic look.

After the candle stick was dried I applied a coat of black glaze and quickly wiped it off with a clean, dry rag.  I bought a can of black glaze at Lowe's.  Valspar makes it.  They mix it up in the store.  $18.00 a can, but lasts forever.

I added the vintage graphic (just for decoration) and tied it up with jute. The graphic I got from the The Graphic Fairy.
 The landfill piece is now nice enough to actually display.

From trash to treasure: for sure!

Christy


01 02 12

Thursday, July 4, 2013

Redux: Rocking Horse

This was a quick and easy project that surely proofs that one man's junk is another man's treasure.

Something that someone had no use for landed up with me and I created a cute, useful item.  I don't have any little ones anymore so I'm selling this to someone that has children around (or maybe not).  I also think it would look darling out on a porch with plants on it!  I purchased this at a thrift store for 4 bucks.  Solid natural wood and well made.  It was spray painted and left in the sun to bake dry.
 I had some stencils at home that were used for painting glassware so I used them to outline a bunch of flowers on the seat of the horse and two for the eyes.
White seemed like a good color with an outline of black.  All hand painted with acrylics. I thought it came out pretty cute.  Hope someone finds it a new home.  I love searching around for items that I have a vision for.  This little guy fit the bill!

Hope everyone has a safe and fun Fourth of July!

Christy
01 02 12

Monday, July 1, 2013

Decorating Storage Containers

I have a bunch of these plastic and glass canisters that are great for storage, but boring to look at. I decided to store laundry detergent in one, fabric softener, doggy treats and a collection of buttons for the sewing room in the others. 
Adding graphics printed off the computer and adhering them with Mod Podge seemed like a good idea, so I gave it a shot. I like the vintage look, so I looked around for those types of images.  

Here's the problem.  Where do you get good graphics for free?

The Graphics Fairy, of coarse!


She has the best images around and they are all FREE.  Free images are not easy to find these days, but she has plenty.  Just about anything you want is on her site.  You can look through the collection (all by subject) and pick an image.  Download and print.  It's that easy.

All these images are from her site.  Here are two for the laundry room containers.  These are vintage images in sepia tones. I applied Mod Podge (matte finish) to the printed picture and placed it on the container. 
After the print is dry, I applied another coat to the top to seal it. 

Here's another laundry soap container.

Doggy treats and buttons.
Love the look of these containers all decorated and they look great out on a shelf.

Christy


01 02 12

Thursday, June 27, 2013

Trash to Treasure

I found this cabinet that probably came from Target (at least the tag looked like it).  Sort of cute and certainly cheap enough.  The cabinet was baby blue and the drawers were yellow.  Would have been great in a babies room, but I don't have any of those anymore.

I forgot to take the before picture.  I'm getting rusty these days.

Anyway, I liked the cabinet and saw some potential. I pictured it black and white.  I was going to change the knobs too, but decided to keep them (for now).

The vintage look seems to really be in these days.  I love the "shabby chic" look but thought maybe I'd try something a little different.  Crackle.

I know it's been around for a long time, but I just felt like I wanted to give it a try.
 This just happens to be the crackle medium I used.  I didn't read the directions....ugh.....read the directions, it really helps!! I lightly sanded the cabinet so the new paint would adhere.

I painted the entire cabinet satin black, including the drawers.  The crackle technique was used on the drawers.  I selected a white background with black crackles.  Love it!

 The knobs are just the opposite.
 All finished.  One persons blue and yellow junk, turned into something I really like.  I may change those knobs in the future to an antique looking knob. That's just something I'll look around for in my travels.

On a totally unrelated topic, this sweet puppy was found at the gas station by my wonderful, animal loving daughter. He was dropped off there by some very heartless people.  Full of fleas and ticks, he was bathed, de-ticked, dried, fed and watered. The next step: we found him a wonderful forever home. The sadness is completely gone in his eyes and he's like a new pup!! Better news: the people across the street adopted him so we can watch him grow up.
 I think he may be beagle/retriever.....maybe.  Plus, he has a little white heart on his forehead.
 I'm so proud of my daughter, Taylor. This is the second dog she has brought home in one month.  Both of them tossed out by their owners.  She found a great home for both.  You'll have to come back to my blog to meet the "other" doggy she found.
If you have love to give and a home to offer, go to your local shelter and adopt a dog or cat.  There are so many homeless pets out there just looking for a warm bed, some food and a little love.  I promise, they will be your friend for as long as they live!

Christy
01 02 12

Monday, June 24, 2013

Buying Junk

I'm just venting here for a few minutes.......
     For years I've traveled to local thrift stores looking around for junk that could potentially be turned into something useful or decorative. Places like the Salvation Army and Goodwill carry tons of items that are no longer useful to the owners.  Many items are in need of paint, repair work and just someone that sees its potential. You need vision, a creative mind and some time to work on these items.  Prices were never a consideration because it's all cheap...........at least it used to be.

     I am now just amazed, but troubled by how expensive these places have become considering most of what they carry is plain, old junk.  Sometimes I see furniture that needs so much work that it's not even worth purchasing it.  Then I see the price and really want to scream.  What's happened here?  The media.  Television shows that give everyone the impression that there is so much hidden value in junk.  Not so.  Not for most of us. Internet and newspaper stories about million dollar items found at the Goodwill.  Yes, it has happened a few times but when was the last time you bought a painting at the Goodwill that was worth one million bucks? No me, not you...not very often.  I guess this gives thrift stores the right to charge $10.00 for a scratched up, broken picture frame (because maybe it's worth lots of money). Most of the stuff they carry is worthless junk.  Someone like me looks around, finds something for a few dollars, takes it home and converts into something nice. That usually takes lots of time and work on my part. So why do we have to be scalped?

just sayin'

     I know that these places do great things for people in need , but I think they are trying to take advantage of the public who is falling for stories of great riches at the Goodwill. So.....if anyone is listening out there, lower your prices on broken, scratched junk.  There, I said it.

And.......garage sales lately?  Really?  I've had them in the past.  Usually I do it for several reasons. Spring cleaning, things that are starting to collect-in mass and because, they can be fun.  I don't put anything out there unless it's junk.  I can't even bring myself to go to garage sales anymore.  People think their "junk" is actually worth more than what they paid for it! Wow, they all must think people are stupid.

Ok. I'm done venting now.  You may or may not agree with me, but it seems like the price of "junk" has gotten out of control.

Happy Hunting and I hope you find some good junk for a good price!

Christy


  01 02 12

Friday, January 25, 2013

DIY Custom Coasters

I've been working on a bunch of coasters lately. Not really anything original or new, but lot's of fun to make and very practical to have around.  When I first started making these I realized there was going to be some trial and error to get them just right. Some of the problems I ran into were: too many wrinkles in the finished product and some real sticking problems after the coasters was completed.  I tried clear spray and polyurethane but the coasters still were sticky.  I finally tried Polycrylic and it worked perfectly.


Here is what I used:
1. 4" X 4" white tiles.  Plain, cheap tile .17 cents each at Home Depot.
2. Mod Podge-matte finish works best. (found that out the hard way). The gloss dries and remained too sticky.
3. Polycrylic by Minwax This is a must for coasters.  All the other finishing products do not prevent the Mod Podge from remaining sticky. So, if you stack the coasters, they stick together or if you place a hot drink on them, the cup sticks to the coaster.  The Polycrylic works perfect.  No more sticky Mod Podge.  I have always found that to be a problem when using Mod Podge. I also helps to allow them a few days to cure.

4. felt buttons for the bottoms of your coasters.  You can use cork too but for me, it was too much work.
5. Acrylic paints if you want to add some embellishments.
6. Decorative tissue.  I used tissue napkins for these, but you can also use decorative papers.


Here is the tricky part.  Getting that paper napkin onto the tile without a lot of wrinkles left on the tile.  How to do this? Applying the napkin a little at a time.....

Start at the bottom of the tile.  Apply a line (about 1") of Mod Podge and place your napkin onto the tile. Carefully (and I mean carefully with patience) smooth out the wrinkles with your clean, dry finger.  Continue up the tile.  Add one section at time until your tile is covered with the tissue. 

You only have a small window of opportunity to smooth out the wrinkles.  You won't be able to get them all out either, but it gives the tile character.
If the tissue was larger than your tile, don't worry, let it dry and use sandpaper to remove the excess tissue from the sides.

I landed up painting the sides with a coordinating paint.  Sometimes I added some hand painting to the coaster.

Apply two coats of matte Mod Podge on each of the coasters.

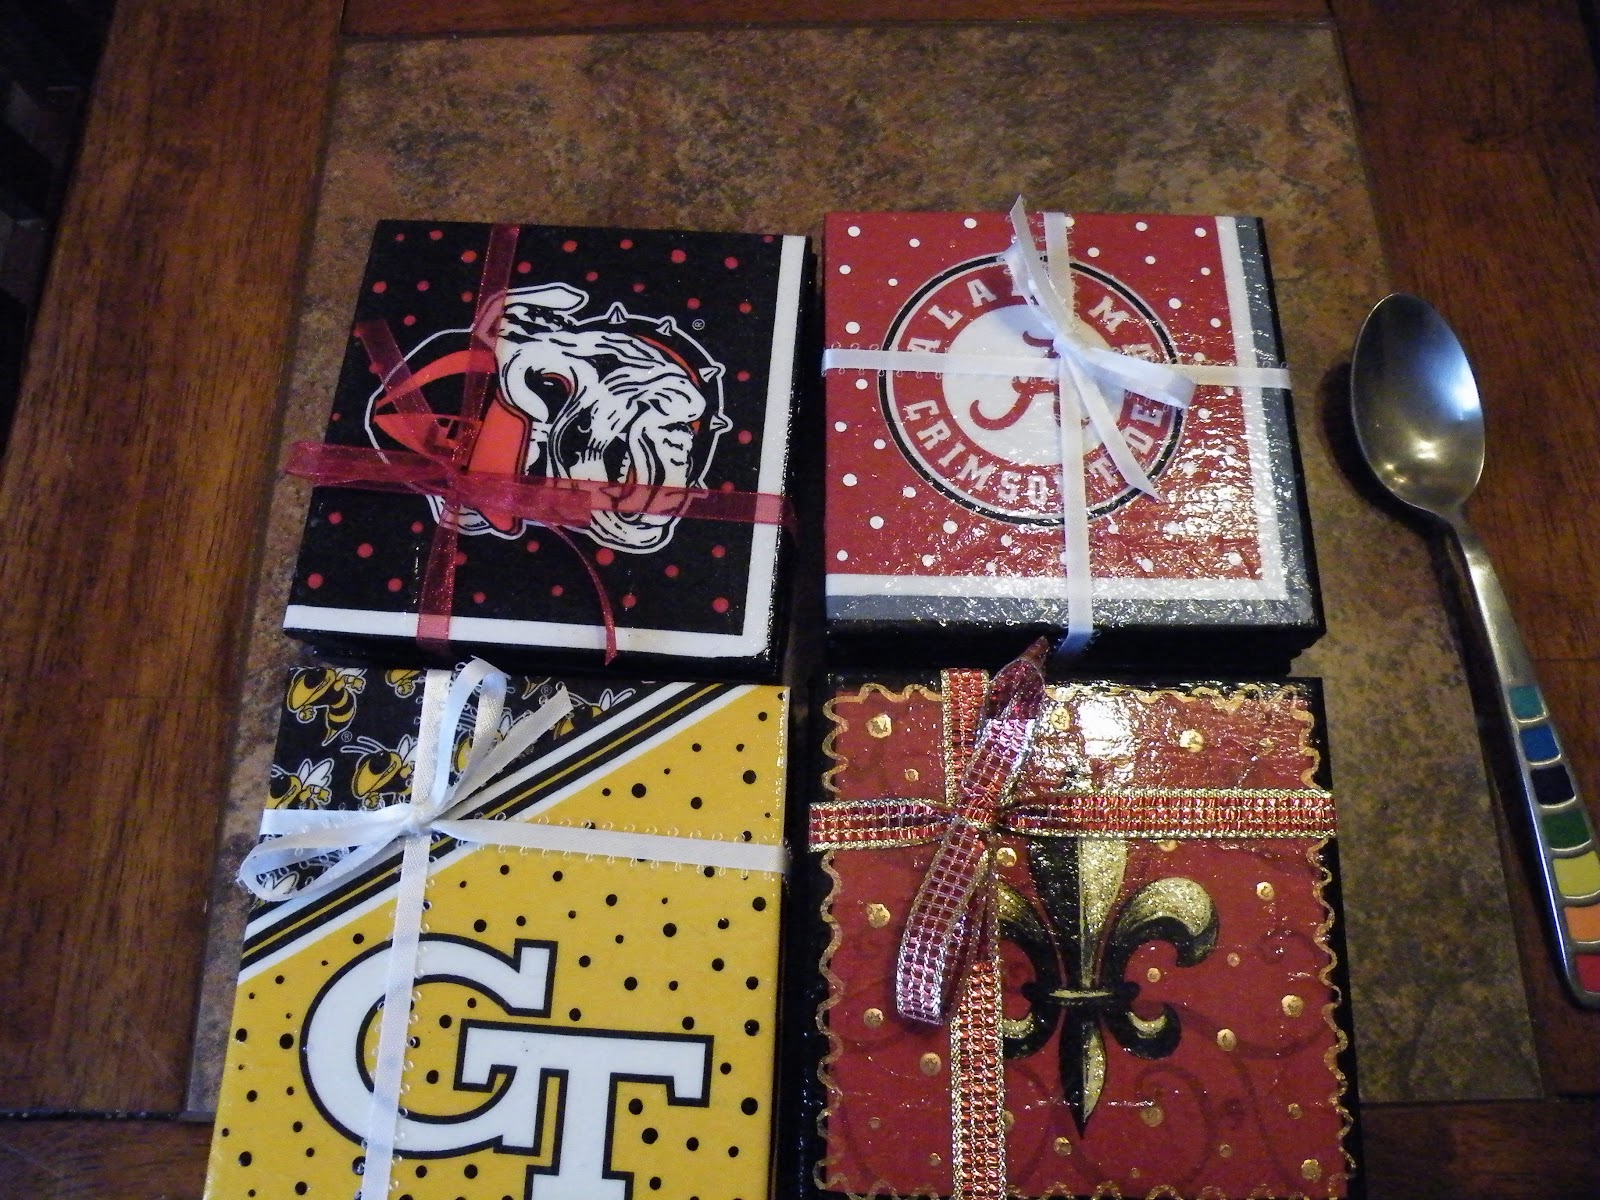
Let the tiles dry overnight and then apply 2 coats of the polycrylic. A small can of Polycrylic costs about $10.00.  Seems like a lot, but the can I purchased lasted a very long time. These coasters make great gifts.  They can be custom made for just about anyone that has an interest as you can see from the pictures.
 Here are a few that I just finished:


People seem to love the sports themed coasters. Just about anything goes!


01 02 12