Showing posts with label Hand Painting. Show all posts

Tuesday, February 21, 2012

Changing The Look of Kitchen Canisters


Exactly why are canisters so hard to find? I looked around for a set for a long time before I found three in Kirkland's. They weren't great, but they were the right color and functional, that's all I was looking for anyway.
However, the tops were cheap, quickly broke and looked like crap. Take a look:

The plastic tops cracked and just looked cheap to me. I thought about a way to make the tops look like a better match to the kitchen and provide a richer feel. I purchased three decorative wood disks at the craft store, on sale $1.00 each and painted them with acrylics. I selected several colors that would compliment the bases and just changed the position on each top.


Check it out below:

After they were finished I put three coats of Rustoleum Triple Thick spray on them. I love this stuff!! I gives you a "glass" finish and dries very quickly. I've been able to get it at Walmart for a pretty reasonable price.

At least I don't have to go out and buy more canisters now. These now look like I wanted them to look like in the first place. The lesson learned here is that you can sometimes fix up something, add to it, subtract or embellish it to make it what you want it to be.


More Clipboards....

I've also painted another clipboard. Clipboards make a great canvas for painting. I got the idea for this picture from a photograph on the Internet and then just added, subtracted and rearranged some of my own ideas. This also has at least 5 coats of the Triple Thick Gloss. Although you can't see form the pic, the surface looks like glass.


This clipboard was actually a lot of work, but I did a little at a time and had some fun with it.

01 02 12

Thursday, April 7, 2011

Creative Canisters

I've been looking around for some inexpensive jars to store cotton balls and Q-tips in. Ya think that's easy? I thought it would be too. Not only is the selection limited, but the actual jars aren't cheap. So if I need something that will match the bathroom and won't cost me a lot of money, then I have to make them myself. That's what I did!
I purchased these plain, glass canisters in Walmart. I paid about 3 bucks for both. They each have a rubber gasket on the inside of the lid. I removed them so they can be opened easily. I guess they were put into there for food storage.


So you get the idea, right. Plain, inexpensive and functional.

Now the trick is to make them look a little more unusual or creative.


I found these two wood disks in the craft store in the clearance aisle-about $1.25 a piece. I've used these before and I love the way they look when they are painted.


So my idea is to paint the disk with some acrylics (that way they will match the room), add a knob to the top and glue them to each canister.


Here is the top, painted. Basically, it's painting the wood with a small brush-easy enough. I added the ball to the top and screwed through the wood disk. The dots on the knob are made by using the tip of a paintbrush handle. (yes, I got this idea when my daughter had her toenails painted with dots-that's how they did it and they came out perfect).
I glued the wood disks to the glass tops using clear Silicone adhesive. This works well for me and I've used it before. It goes on white but dries to a clear finish in 7 days. Not that anyone will look at the bottom, but just in case-they look good.


Since they're going into a "teens" bathroom I've painted them with that in mind.


Below is one of them all finished. By the way, I sprayed several coats of Krylon's Triple Thick Glaze on these tops before they were glued onto the glass. This product, which I love, gives everything a "glass" finish. Interested in using it, click here for more information. You really can't appreciate how glossy the top is from the photo. You can take my word for it though, it really makes things shine.


Both pictured below. Notice one canister is larger than the other? That means that one top is larger than the other. I wondered about this while coming up with the idea and how it may look, but in the end they came out looking just fine. The total cost= around 7 bucks.


Chris
01 02 12

Sunday, August 8, 2010

Fixing and touching up Goodwill paintings


I don't usually look around too much at paintings and prints at the thrift store. Lately though, I've been taking a second look. A few months ago I found a great print (future post) and a few weeks ago an acrylic painting. Actually, my thrift store-partner in crime found it. I had passed it up and she came right behind me and placed it into her basket. She asked, "can you fix this for me".
Taking a good look at it, I noticed several scratches and some general "wear" issues, nothing that can't be fixed with some paint!

I took it home with me and got to work. The truth is, it sat around for a few months before I got to it, but I'd like everyone to think I'm on top of these things.........not really...

The trick was to match up the colors and touch up the scratches. It didn't take long and it cost next to nothing. Now I have a better appreciation of "paintings" and "prints" in the thrift store. I look more closely now. They can be fixed!

Here it is all touched up. It's now hanging in my friends bedroom.


01 02 12

Tuesday, April 6, 2010

El Cheapo Cacti


Everyone makes mistakes, right? I walked into a large box store (not going to mention the name) and the sign under the cactus said, "cactus $1.00". Well, to me that means all the cactus are a buck, right?


That really wasn't what they meant. They actually were discounting all the broken and dying cactus, not the entire shelf. But isn't that "false advertising?". My question exactly! So they landed up selling me any cactus I wanted for a buck. Since I love the plants, I bought 20 of them. Oh yes, they will fill my entire window sill or several of them. I love cactus for several reasons. They are hard to kill and require very little maintenance. Although, not the easiest of plants to transplant into pots, it is doable-you just have to wear heavy duty gardening gloves.


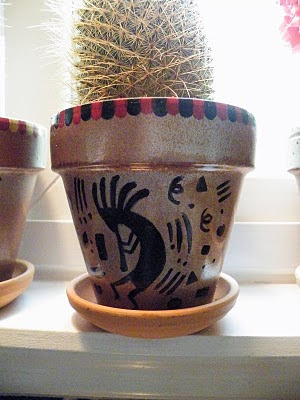
Such a deal allowed me to buy some clay for planting. I painted all of them with acrylics and sealed them with a clear gloss spray. I'm not sure if you are suppose to seal clay pots, but they looked so much better and I wanted to preserve the painting. Clay pots are so much fun to decorate. I've done mosaics on them, mod podged them and hand painted them. They always come out looking great, and lets face it, clay pots are pretty cheap. Decorated by hand they can make great, inexpensive gifts. You can find some great tips on taking care of your cactus here. Scroll down for the info.


I looked for some common and unusual primitive designs to copy onto my pots and this is how they came out.

I'm not sure what all of these symbols mean, by the way, but I liked the way they looked.


I only painted a few of these pots for now. I did purchase 20 cactus!! It's a big job.


and more......

Here are a few of them that are completed and up on the window sill.


and...
6 down, 14 to go!

Christy
01 02 12

Sunday, November 29, 2009

It's the little things that count

A couple of months ago I bought this little garlic storage thingy at Goodwill. It's made of terra cotta and I'm pretty sure it's for baking garlic in the oven.


Pictured below:


I don't bake garlic, or at least I never have done so I opted to paint it. I used metallic acrylics which I have a collection of. These paints, available at crafts stores are so pretty and priced cheap enough so you can buy plenty.
When it was done I sprayed it with extra glossy clear spray sealer. For 99 cents, it's now pretty cute and I'll use it to store garlic in.


I always manage to find little gems in the Goodwill that I can actually do something with. When I picked this up I could just imagine how cute it would look all painted. I especially love the little garlic on the top. There is no question as to what this item holds, if you get my drift.


Christy


01 02 12

Sunday, November 2, 2008

Ceiling Medallions


How You Can Spice Them Up

You've seen them out there-ceiling medallions. Available in the home improvement stores these can add architectural design and can hide imperfections on your ceilings. Most of them come in plain white. You can paint them to match your room or antique them-giving them an older look.

This one hangs in my dining room above the table. I used colors from the room and painted the disc with acrylics. I always seal them with a clear coat before hanging.


The medallion below was painted in the same way using acrylics. This had more detail, but the pattern was already on the disc and that made it very easy to follow. I have two of these hanging over ceiling fans on the screened porch. The colors are a bit more vibrant but the outdoor porch can handle the additional color.

Lastly, this hangs in the kitchen above the stove. Since the kitchen didn't look like it needed any more color, I antiqued this using a stain. I just wiped the stain along the disc.

Just imagine what you can do with these. Ceiling medallions can also be used for wall art. They actually make nice mirrors. You paint the disk, insert mirror where the hole is and you're done.


01 02 12

Saturday, July 19, 2008

Ideas You Get From Summer Vacation

At the beginning of the summer my family and I traveled to the beach in South Carolina. During that time we visited the local flea market to look around and see what little bargains we could find. I noticed some very cute bottles there that were probably meant for keeping olive oil. The bottles had spouts on the top for pouring and were all hand painted. Each bottle was priced at $15.00. It was tempting to buy one but I new I could probably make it myself.

I was pretty sure I knew exactly what I would need to make it but wasn't sure where I would find that particular type of bottle. A couple of weeks later I happened to find the bottle I needed in Walmart in the kitchen gadgets department, priced at $2.98-so I bought two. One for olive oil and one for vegetable oil. How handy! Keep them right next to the stove and they are always at hand and ready to use. I like that idea because I use lots of olive oil when I cook.


Here is what I needed to make my bottles.

  1. Glass paint

  2. paint brushes

  3. clear gloss
    and..........one black sharpie paint marker

Notice that both bottles have the spouts on the top?


Thinking about what I wanted to paint onto the bottles I decided that a pile of small olives on each side of the bottle would work for the olive oil. I also thought that would look cute. The other bottle was going to hold vegetable oil so I painted a hot red pepper on it (yeah, I have a thing for painted red peppers). One pepper on two sides and a small vine on the other two. I applied a gloss over both to preserve them. Here's the result.


They actually look very much like the original ones I fell in love with at the beach. Tomorrow I'll add vegetable oil and olive oil to both. Just for some added flavor I'll be adding some garden herbs to the olive oil.

Lucky for me I had several colors of glass paint in the house so the total cost for both bottles was about $6.00.

For those of you that signed up for the Lowe's free quarterly magazine, you will enjoy seeing the great ideas they have this month. They have a segment on chalkboard paint and also whiteboard paint (which I didn't even know existed). What a great idea for the back of a teenager's door or even in the kitchen! They can write all their "stuff" on the whiteboard right behind their door. Check it out and sign up. It's free!

01 02 12

Thursday, March 13, 2008

Fun With Clay Pots

Just like the picture frames in the previous post, clay pots are can be fun to decorate. Below are some examples of what you can do with them.

Paint, decoupage or mosaic them for a unique and creative look. Remember to spray them first with a sealer.


This is a project that you can even get your kids involved with. Have some fun and create some new pots for around the house.


01 02 12