


The Porch Needed A Face Lift
It started with some rot on the molding around the front door. It lead to repainting the railing, painting some windows, adding some flowers, painting the garage door, adding some urns, replacing the front lanterns, painting the front door and cleaning the windows.
A little rot opened up a large can of worms. One thing just lead to another.
Take a look:

After fixing all the rot around the door (if you want to see how I did it or before photos click here:
http://christys-thriftydecorating.blogspot.com/2008/09/fixing-wood-rot.html ), I gave the front door a new coat of paint. Black with a border of cinnamon. I installed some new hardware since the old stuff was worn and not very secure.
So what was thrifty about the door? I made the stained glass myself (oh, that saved me plenty), and I happen to have the black paint in the basement, so there wasn't much of a cost. The hardware however, was not cheap but I justified that thinking we need the security, right?
 I installed these lanterns. I found two of them on sale at Lowe's. No electrician needed, I did the wiring myself. I do only basic electrical work. The plant hangers beneath were sprayed with black Rustoleum. They use to be a light shade of green.
So now that the front door and trim had a new coat of white paint, I had to do something with the large atrium window above. I hired this job out ($190.00 for priming and painting inside and out). I don't do heights, so it had to be done. Chalk it up to homeownership.

The railing was scraped down with a wire brush, primed with rustoleum primer and sprayed with high gloss black. Looks like new.

One thing just lead to the other. Now that the door looked great, the trim was painted and the railing looked like new......the little tin roof about the front window needed paint. I brushed this from the windows above and finished with a ladder. Not really high, so I could handle it.

These urns I purchased at Lowes. They were on sale for $45.00 each. They are very well made and are pretty large. Best to wait until the end of the season to buy things like this. They are so much cheaper. These urns were $89.00 each during the peak of summer.

These stones I actually had hanging around the yard doing nothing so I used them to build an additional place for flowers right next to the front porch.

Here are some photos of plants in the front containers. The reason I'm showing you this is that some of them are not real. The ferns I added are from Walmart and you can't kill them. You really can't tell that they are fake and add to the fullness of the arrangement. I am not a fan of plastic or fake flowers outside, but I think you can use them together to really fill up garden containers. I find that the greenery works but stay away from plastic flowers. They just look "plastic". 
I installed the scalloped garden edging (I also had that hanging around) into the front garden bed. Below another shot of the edging. I dug that all in...what a pain!
The mums I purchased at Aldi's for $2.99 each. What a deal!


Last but not least, the $1.00 clearance- garden gnome....priceless. 
Well, it was a ton of work, but satisfying in the end. The front of the house now looks so much better. A coat of paint can do wonders.

01
02
12


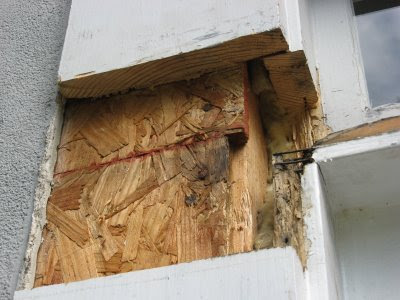 This is another section, all cut out and left to dry in the sun. Pretty bad looking isn't it? I measured out a piece of wood to glue in using liquid nails.
  Here is my replacement piece, glued and nailed in. What do I use for filling all those cracks and crevices? The best product ever. I read about this a few years ago on several different websites about filling and repairing rotten wood. It's called Bondo and it's available in Lowe's and Home Depot.
 All sanded and primed it now is clean, dry and strong. Oh yeah, it looks better too. I won't kid you though, it took a lot of work.
 All the pine pieces are caulked (I used my free sample that I got in the mail) and primed several times. All four of these rectangles will be connected with trim. When it's all done, I'll take a photo and present it to you here.


