Showing posts with label Crafts. Show all posts

Thursday, June 26, 2008

Help with the Photo CD coasters

Help With the CD Coasters

I have received lots of email from readers who were particularily interested in making the Photo CD coasters.


Please see: http://christys-thriftydecorating.blogspot.com/2008/06/photo-cd-coasters.html


I mentioned that you could download free photo software from: http://www.snapfiles.com/get/photofiltre.html


It's free, easy to use (with a little practice), quick to install and boot up. My daughter introduced me to this software and showed me a great little trick. Use a color photo, change it to black & white, and keep one item colored. Many of you emailed me about this so I decided to provide my own directions. Here is what it does.
Above is the before photo.
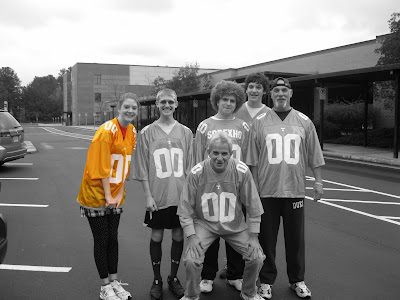
Here is the photo after. Notice I left "one" football jersey orange. I could have left them all orange has well. This is just one great feature that the software offers. Here are the directions.

  • Download the free software
  • Get yourself a colored photo and put it onto your desktop where you know exactly where it is.
  • Open Photofiltre
  • Go to FILE, click on open. You should now be looking at your photo.
  • Go to SELECTION and click SELECT ALL
  • Now RIGHT CLICK on your photograph and click INVERT SELECTION
  • Go To the right of the software and grab the lasso (you know the one, it looks like what the cowboys use)
  • Bring that over to the part you want to color . Use the cursor and outline the item. Please don't worry about getting it perfect, the software will fix it for you in the end. Just try to get it the best you can and the most accurate.
  • Go the the top tools and click FILTER, Go down to COLOR, go over to grayscale.
  • Now go up again to the top and click on SELECTION, go down to HIDE SELECTION

You are now finished. I love this look on the coasters.

Here is another site that show you step by step instructions.

http://i29.tinypic.com/2i6c1zp.png

This free software also does so much more. I'm still experimenting with it and having some fun.

I hope this helps all of you that had questions about this software. Please feel free to email me at clturner3@aol.com if you have any questions.

01 02 12

Thursday, June 5, 2008

Photo CD Coasters

There are so many great ideas out there in cyberspace. I love looking around and finding ideas that I can use myself. I have mentioned http://blog.craftzine.com/ before. They look around at other blogs and pick the best ideas to bring to all of us.

I found this a few weeks ago and couldn't wait to try it. Thanks to Anitra's coffee-pot-people blog http://coffee-pot-people.blogspot.com/ for this great craft idea. I've tried it out and am real happy with the results. My directions may differ a little, but the end product is the same.

Here is what you will need.

  • Old CD's or DVD's and some great family/friend photographs. You can scan some old photo's as well.
  • A computer and good printing paper
  • Printer
  • Adhesive spray
  • Clear, stick on vinyl (I purchased mine in Joann's Craft store in the fabric/notions department
  • Good, sharp scissors

Thanks to my youngest child (age 15) I just downloaded a great FREE photo program. It's very user friendly and gives you the ability to turn your digital photos into real art work. You can try it yourself: http://www.snapfiles.com/get/photofiltre.html .


I used this photo program to make my color photos black & white and was able to turn only one specific part a color. I really love that effect on a photograph.

Start by printing out a photograph. Make sure it is large enough to cover a standard CD/DVD-about 5", but measure yours to be safe.

Print out the photograph ( here is mine below).
Get your old CD/DVD ready for "glue" spraying. I suggest putting down a piece of newspaper because that glue goes everywhere. Quickly spray the CD and apply your photo to the sticky side. Make sure it is aligned and centered. That's a little tricky, but I managed. Take that CD off of the newspaper with the photo attached right a way otherwise, you will have the newspaper stuck to the back. (don't worry if this happens, you can just cut it away.Here is my CD stuck to the back of the photograph. Now take good, sharp scissors and cut around the CD. Trim, trim, trim.....to get a nice clean edge.
Here is all that trimming going on.


Now get your clear vinyl. Pull apart the stick -on vinyl from it's paper and apply onto the top of the photograph. Rub it onto the disk with your fingers and trim. Don't worry if there are a few small wrinkles. You will be ironing them out so the disk becomes "laminated."
Next, fire up your iron onto a medium, wool setting. When it's all heated up, place paper over your disk and hold down the iron for 8 seconds. Then move that iron around all over your disk. Your photograph is now laminated. This will protect the photograph from drinks that you will later place on your coaster.Mark the felt, cut it out and apply to the bottom of the CD/coaster.

Here are three finished coasters. Notice the one on the lower left. I used the new photo program to make the flowers on the hat colored. The rest of the picture is black and white. I happen to be fond of B&W photos, but color would probably look very nice as well.

Some ideas for these coasters:

  • Great gifts for friends, family and especially for teenagers. They love collecting photos of their friends, so why not give them as a gifts.
  • A great summer craft for teens to do. Instead of spending all day on Facebook or Myspace, they can download their photos and get to work.
  • I'm pretty sure you could drill into the disks (no, I haven't tried it yet) to make them hangable.
  • Wall art! I could see these CD's filled with family photographs and applied to to a wall as a "border". What better way to let everyone view your family moments...like vacations, graduations, etc...In this case, you would not have to apply the felt and could use Velcro squares to hang each one.

An easy craft to accomplish and fairly inexpensive to do. I already had the spray glue, the CD's and the printer paper. I had to purchase the contact paper and adhesive felt which didn't cost much.

01 02 12