Wednesday, April 25, 2012


Hi there! Iím Jessica with Arcadian Lighting, which is a great website and blog for all your light fixture needs! Iím delighted to be guest posting for Christy today because Iím going to be sharing a collection of inspiring interiors with chic leather details. A single piece of leather furniture or accent can add a sophisticated, timeless beauty to any room. I hope you enjoy!

Chic Leather


This warm and inviting living room features a mix of vintage and recycled pieces. The 1960s white leather chair adds a particularly cool vibe.


Chic Leather


The beautiful leather inserts in this oak wall radiates professional and sophisticated. The circular table lamp on the fireplace mantel is a handsome accent piece.


Chic Leather


The distressed quality of the leather ottomans in this eclectic living room adds just a bit of rustic beauty. The fluffy floor pillows and horn accents give off a certain animal magnetism.


Chic Leather


This dining room is absolutely vibrant and romantic. The Kelly Green leather chairs are a brilliant pop of color, and the contemporary pendant light is unique and eye-catching.


Chic Leather


A single woven leather bench in this master bedroom adds a rich dark color to contrast with the pale neutral used throughout the rest of the room. The black pendant light creates a stark focal point.


Chic Leather


The stunning warm color of this dining nook is grounded by the leather upholstered dining chairs. The butterscotch yellow curtains add a beautiful radiant glow.


Chic Leather


The leather Chesterfield upholstered coffee table makes quite a statement in this chic living room. Each piece of furniture has its own character, which blend together beautifully.


Chic Leather


This cozy living and dining room features a set of chairs that are certainly eye-catching. The leather upholstery and over-sized rivets make a dramatic effect. Images 1 | 2 | 3 | 4 | 5 | 6 | 7 | 8

What do you think of leather in interior design? Let us know in the comments! And be sure to go here for a brilliant pendant light or wall sconce to brighten your home!
01 02 12

Wednesday, March 28, 2012

Space Above the Cabinets and More Groupings


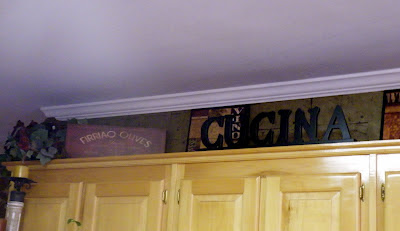
People really seem to struggle with ideas for decorating above cabinets. If you have soffits above your kitchen cabinets, then you know what I mean. I can't tell you how many times I've arranged, rearranged and struggled to find "just" the right flow. My friend seems to get it right. Here are some photos.


It's all about grouping, themes and spacing. Don't forget to line those tops with newspaper. Once a year, take up the paper and replace. It will save you a ton of work-and boy does it get dusty up there.

Christy
01 02 12

Friday, March 9, 2012

Easy Furniture Refinishing

I've done plenty of pieces of furniture, in many different ways. Strip, sand, stain and seal. Sand, paint and glaze. Sand and paint....etc. Faux finishes, painted finishes, stencils and more. But some people don't have the time or the head to go through the steps or the additional work. And let's face it, who wants to sand anyway???

My friend recently wanted to refinish her kitchen set. It was solid wood with a light oak finish. She picked up this product made by Rustoleum and decided to give it a try. It's a complete kit with everything you need to complete you project. I have to say -the results were astonishing. No sanding involved!! Wow. Now that's easy. Below is the product. It cost her about 80 bucks. It comes in all different colors and finishes. It also gives you a choice of opaque or solid.
I just wish I could have gotten the picture of the "before". Just remember, it was a light oak color. As per my friend, she had to clean the furniture with something that was included in the packaging. Apply the finish and then apply a sealer (all included in the kit). If your finish is "opaque" then you apply a glaze. Her finish was solid, so applying glaze was skipped. Here is a photograph of the kitchen set all finished.

Another view.

She selected a black color and the photograph shows the wonderful results she got. My question to her was, "how does it hold up?". The answer was "great". So far, it's held up very nicely. No chips or undercoat showing through and she did this 8 months ago. FYI-she has three kids!! That should tell you something about durability.

She did another project using the same product on two tables in her living room. In this case she picked a brown color. Below-the results. This was also a "solid" color.


What I love about this product.

No sanding.
Easy.
A variety of colors to choose from.
Not really that expensive for what you get.
Durability.

If you would like to view some more information on Rustoleum's product, check this out. The actual product name is Cabinet Transformations.
I'm toying with the idea of using this product in my office on build in cabinets that are currently white. Maybe..........


Christy

01 02 12